DDR TECHNICAL GUIDE
Brake Mount Fitment & Alignment Adjustments
Why Your Brake Mount May Need a Slight Adjustment
Not every e-bike comes off the assembly line exactly the same!
Due to differences in manufacturing tolerances, frame alignment, and normal use, some e-bikes may require a minor fitment adjustment when installing a DDR Heavy-Duty Brake Caliper Mount.
We've test-fitted numerous brackets and found that while some bikes have perfectly aligned factory brake mounting tabs, others may have slight variations. Previous crashes, impacts, or damage to the original mounting hardware can also affect alignment.
This doesn't necessarily mean there's anything wrong with your new DDR bracket. In some cases, the bike's original brake mounting tabs may simply be positioned slightly differently.
How to Identify an Alignment Issue
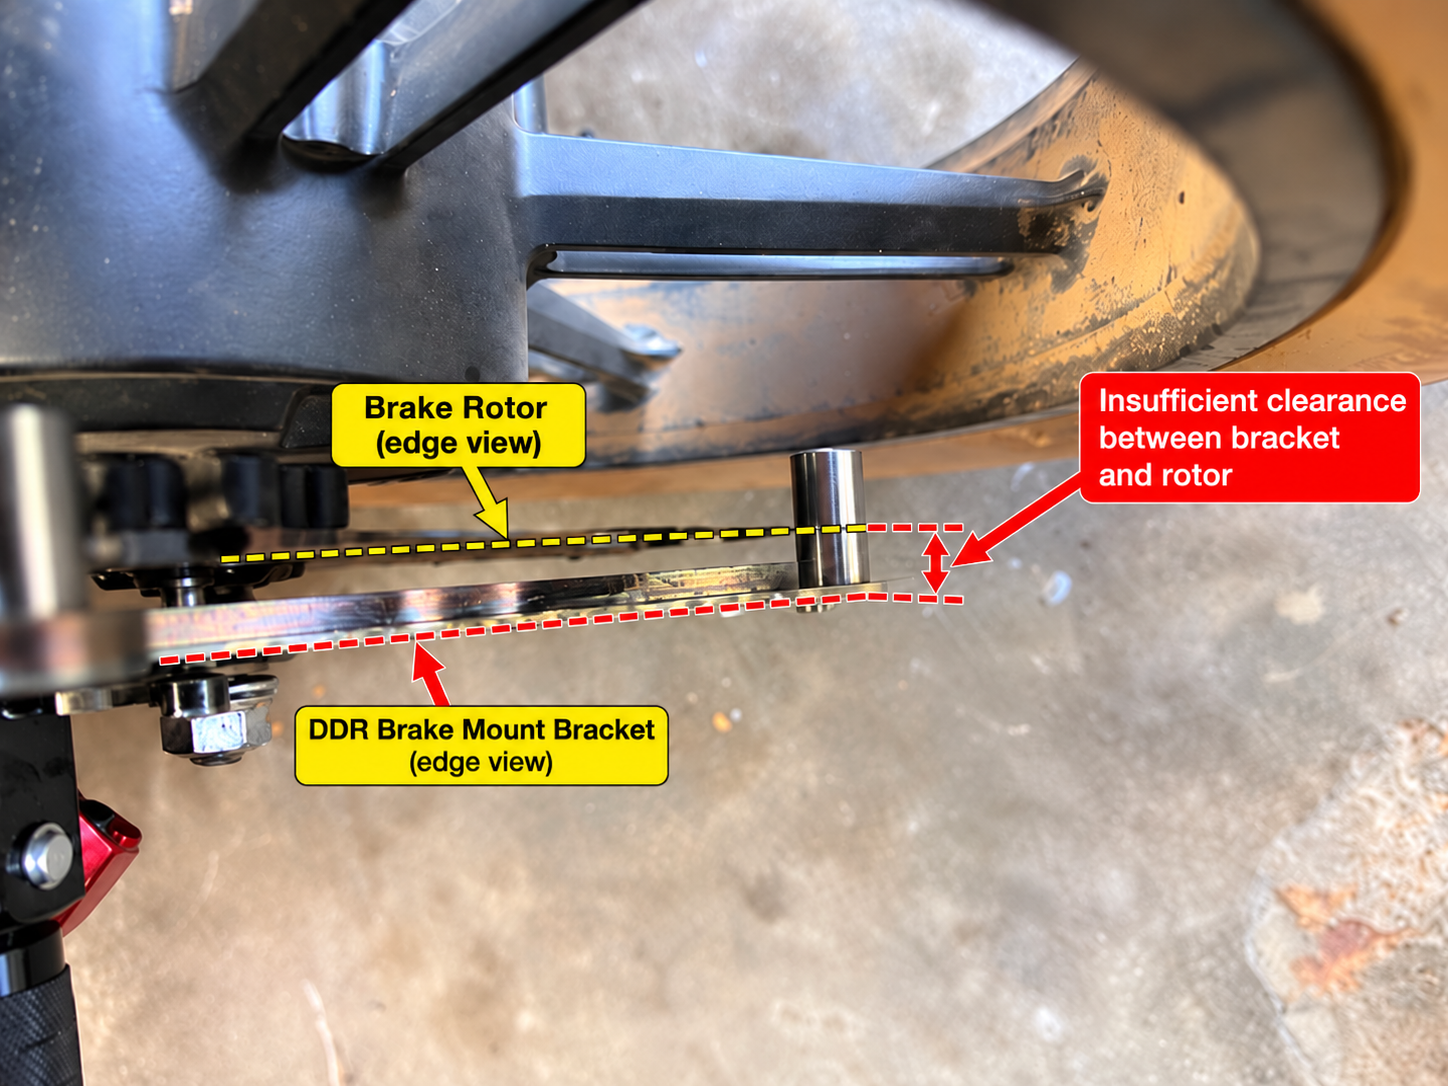
After installing your new DDR brake mount, you may notice that the bracket sits slightly too close to the rear brake rotor.
Ideally, the brake caliper mounting bracket should sit parallel, or very close to parallel, with the brake rotor to allow proper installation and alignment of your Ultra Bee caliper.
Before making any adjustments, verify that the bracket is properly seated, the correct components are being used, and the brake rotor is not bent or damaged.
Important: If the factory mounting tabs appear visibly bent, cracked, weakened, or damaged from a previous crash, they should be professionally inspected before attempting any adjustment. Damaged structural mounting points may require repair or replacement rather than bending.
Minor Brake Mount Alignment Adjustments
On otherwise undamaged mounting tabs, a small alignment correction may sometimes be necessary. Any bending of structural brake mounting points should be evaluated and performed by a qualified technician, as improper adjustment can weaken the tabs or damage the frame.
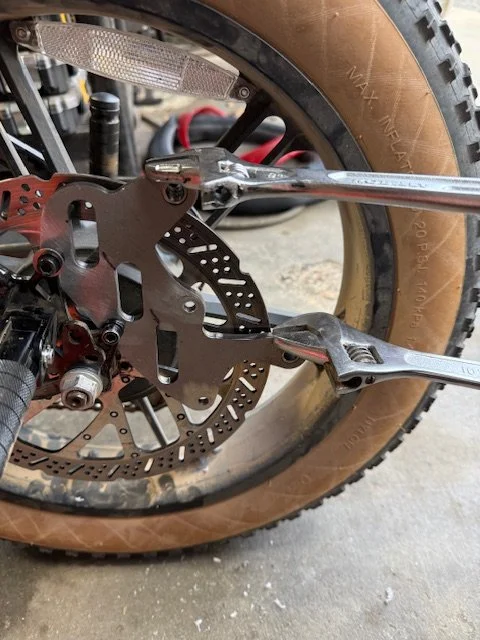
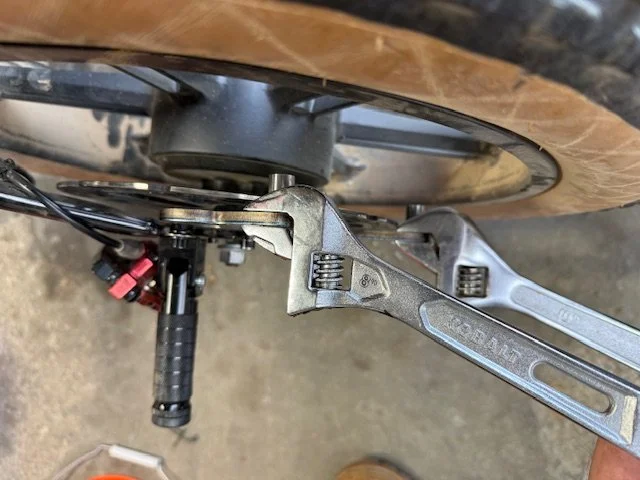
The reference pictures below illustrate the method used during DDR fitment evaluations.
Step 1 — Secure the DDR Mount
Install and securely fasten your new DDR brake mount using the appropriate mounting hardware. Confirm that it is properly seated against the factory mounting points.
Step 2 — Identify the Adjustment Area
As shown in the pictures, two adjustable (crescent) wrenches can be positioned above the caliper slide area to illustrate where controlled leverage has been applied during fitment evaluations.
Care must be taken to avoid loading or damaging the caliper slides, brake rotor, or other braking components.
Step 3 — Evaluate the Necessary Adjustment
If the mounting tabs are verified to be structurally sound and suitable for adjustment, a qualified technician may be able to make a minor alignment correction using controlled, even force.
A little movement can make a big difference!
During our test installations, some alignment differences have been less than 1/16 inch. This is an observation, not a required adjustment amount or a universal clearance specification.
Do not force the bracket into position or continue bending if resistance, cracking, distortion, or other signs of damage occur. Excessive adjustment can permanently damage the mounting tabs or compromise the braking system.
Step 4 — Verify Final Alignment
After any adjustment, confirm that:
The DDR mount is properly seated and securely fastened.
The bracket is approximately parallel with the brake rotor.
The Ultra Bee caliper mounts correctly without being forced into position.
The rotor has adequate clearance and rotates freely without interference.
The caliper slides operate properly and the brake system functions as intended.
All mounting hardware is tightened to the applicable manufacturer's specifications.
Ultra Bee floating-style calipers allow some normal caliper movement, so the bracket may not need to be visually perfectly parallel. However, the floating mechanism does not compensate for excessive misalignment, damaged mounting tabs, or inadequate rotor clearance.
Important Safety Notice
Your braking system is one of the most important safety components on your bike.
Any modification, bending, or adjustment of brake mounting tabs can affect their structural integrity. Do not attempt to straighten mounting points that are cracked, significantly bent, fatigued, or otherwise damaged.
If you're unsure about the condition of your mounting tabs or the correct alignment procedure, have your bike inspected and the installation completed by a qualified technician.
Never operate your bike with an improperly aligned, loose, damaged, or malfunctioning braking system.
DUNE DAWGZ RACING (DDR)
Built for the ride. Ride responsibly. Install properly. Know the risks.